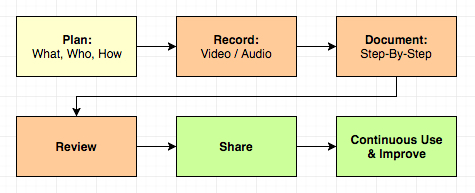
This document outlines the process for extracting, documenting, and optimising business systems (also referred to as: procedures, processes, SOPs) for maximum efficiency.
By following and modeling this system, any team member can produce a completed system document. This document is an excellent example of a completed system – from the overview, to the structure, to the formatting. That’s not to say your systems will be to this standard with your first draft but rather one to aspire to. Systems often take time to mature with regular use and continued improvement.
Note: It is the responsibility of every team member within an organisation to document, improve and teach others how to complete tasks within their role. This creates business efficiency and new opportunities for each team member.
Step 1. Identify the result you want this system to deliver.
- For example, “A Perfectly Baked Cake.”
Step 2. Identify who best produces the result.
- This may be you, someone within your organisation, a known expert or an external consultant.
Step 3. Determine the best method of capturing the process.
- Video recording, screen recording, audio recording, interview or another means.
- The aim is to make the capturing of steps easy for the person sharing their knowledge.
- Suggestion! The ideal method to capture a task is by video recording as it’s being done. This way the person doing the task can simply talk through what they’re doing and why – and their actions are visible to the person learning.
- Suggestion! The ideal method to capture a task is by video recording as it’s being done. This way the person doing the task can simply talk through what they’re doing and why – and their actions are visible to the person learning.
Step 4. Record the task being completed.
- If required, organise a suitable time to record the process.
- Don’t heavily script or plan the shoot and continue shooting even if mistakes are made. In fact, it’s best to keep recording and explain mistakes if/when they happen and what was done to fix them.
Step 5. Upload the file for easy sharing.
- If you recorded a video, upload it to your private video service (e.g. Wistia, Vimeo, Viddler, Private YouTube video, Dropbox, AmazonS3 etc.)
- If you captured the process by some other means (audio interview, etc.), upload it to a file storage/sharing service (e.g. Dropbox)
Step 6. Create a new system in systemHUB.
- Identify the best location for the system
- Suggestion! Create folders based on business departments (Sales, Finance, Operations, etc.) and subfolders as needed.
- Suggestion! Create folders based on business departments (Sales, Finance, Operations, etc.) and subfolders as needed.
- Keep the system names clear, concise and ensure they contain keywords that team members would use when looking to locate it.
- Add an overview that covers: what the system is about and what results/deliverables are achieved from following the system.
- If applicable, post the link to the video of the task being completed in the videos section.
- If applicable, post the link to any other files used in capturing the process in the “Supporting Notes” section.
- Assign the system's primary owner (the person who is taking ownership of the system) and a secondary owner (usually a ‘backup’ person for the task).
- Assign any additional team members who should be able to view/assist in the system’s development.
- Change the status of the new system to reflect the stage it’s in:
- Grey – New system, nothing done. You may be just ‘dumping’ data in a system with this status but haven’t looked at organising anything in it yet.
- Yellow – Under construction. You have started working on the data in the system, but it’s not at a point where others can use it yet.
- Green – Ready to be used. The system is completed enough to the point that others can reference it and get to the end result by following the steps.
- Red – Do not use. The system may be obsolete, incorrect or inaccurate, so you don’t want others to use it. But it may have some value in it still, so you don’t want to delete it altogether.
- Grey – New system, nothing done. You may be just ‘dumping’ data in a system with this status but haven’t looked at organising anything in it yet.
- Notify the new system’s owner (if not you) that the system is ready for review.
Step 7. Create the step-by-step documentation.
- The new primary owner of the system (which may be you) should either complete or delegate this step.
- That person should watch the video recording (or reference the link/s supplied in the Supporting Notes section) and note down the steps in a linear fashion. Eg; Step 1. Do this. Step 2. Do that.
- Save those directly into the "Smart Operating Procedure" section.
- Include additional sub bullet points for further details and clarification comments.
- Suggestion! Once done, a reader should be able to get a good overview by simply reading the numbered steps – bulleted items simply provide extra detail for someone new to the task.
- Suggestion! Once done, a reader should be able to get a good overview by simply reading the numbered steps – bulleted items simply provide extra detail for someone new to the task.
- All steps should be clear enough to allow anyone with a basic understanding of the subject to complete the system.
- Suggestion! Ensure that the formatting of the text is uniform. Each step should have its own number and each number should have bullets only relating to that step.
- Suggestion! Ensure that the formatting of the text is uniform. Each step should have its own number and each number should have bullets only relating to that step.
- Also, ensure email templates and/or any documents mentioned in the system are attached to the relevant spot in either the "email templates" and/or "attachments" sections.
- Add any additional useful information which doesn't need to be added to the SOP itself (sort of like a ‘footnote’ in a book) in the “Supporting Notes” section at the bottom of the system.
Step 8. Review the draft system on the next use.
- Review the system on the next iteration of the task.
- Suggestion! With fresh eyes, review the entire system from top to bottom.
- Suggestion! With fresh eyes, review the entire system from top to bottom.
- As you work through the task using the system, add any missed steps and/or make improvements where necessary.
Step 9. Submit for review and discussion.
- Once satisfied, the system is ready for review by the supervisor and/or to be discussed at a team meeting.
- Suggestion! System owners are responsible for having their systems reviewed and approved.
- Suggestion! System owners are responsible for having their systems reviewed and approved.
- Reviewers can add comments to a system with suggested changes.
- The system gets tweaked based on additional feedback.
- The system owner makes adjustments and replies to comments regarding any changes.
- Once done, the system's status is set to green - indicating it's now ready to use.
- Suggestion! You can also notify assigned users that the system is now ready for use.
- Suggestion! You can also notify assigned users that the system is now ready for use.
Step 10. Teach this system to another team member.
- Ideally, it's best for the system owner to teach their SOP to someone who hasn’t previously done it before.
- During this process, areas of confusion, issues and missed points can easily be spotted and fixed.
- Suggestion! This is best taught in 3 steps – 1. Show the task being completed 2. Do the task together 3. Allow the task to be completed by the team member and review and give feedback.
- Continue step 3 until the team member completes the task successfully without feedback required.
- Suggestion! This is best taught in 3 steps – 1. Show the task being completed 2. Do the task together 3. Allow the task to be completed by the team member and review and give feedback.
Step 11. Use every time the task is to be completed.
- When a new team member needs to complete the task, they’re assigned access to view the system.
- The system is improved and tweaked at each opportunity, making it as simple/efficient as possible.
- Suggestion! Unless you are a system owner or secondary owner, suggested changes should be made as a comment on the system itself - to be then reviewed and approved by the system owner.
Suggested Reading:
-The system for creating systems – David Jenyns
- Checklist Manifesto – Atul Gawande
- The E-Myth Revisited – Michael E. Gerber
- Built to Sell – John Warrillow
- Work the System – Sam Carpenter